Arduino World: From the First Resistor to Smart Devices
Why Arduino at all?
Welcome to the central hub of my Arduino tutorial. If you are here, you are probably not looking for dry theory from textbooks, but for working examples that you can test immediately on your desk. My journey with Arduino started much like yours – with a bunch of questions and a few burnt-out LEDs. Today, on this page, I share tested recipes where I have already found all the errors in the code and wiring for you. Here you will find everything: from basic resistor calculations to complex WiFi clocks and RFID systems for opening doors.
What exactly is Arduino?
Arduino is an open-source electronics platform based on easy-to-use hardware and software. It is designed to make the process of using electronics in multidisciplinary projects more accessible. The hardware consists of an open-source board design and an 8-bit Atmel AVR or 32-bit Atmel ARM microcontroller. The software consists of a standard programming language, a compiler, and a bootloader that runs on the microcontroller. Arduino development boards are sold pre-assembled or in "do-it-yourself" versions.
Technical Explanation of the Board and Pins
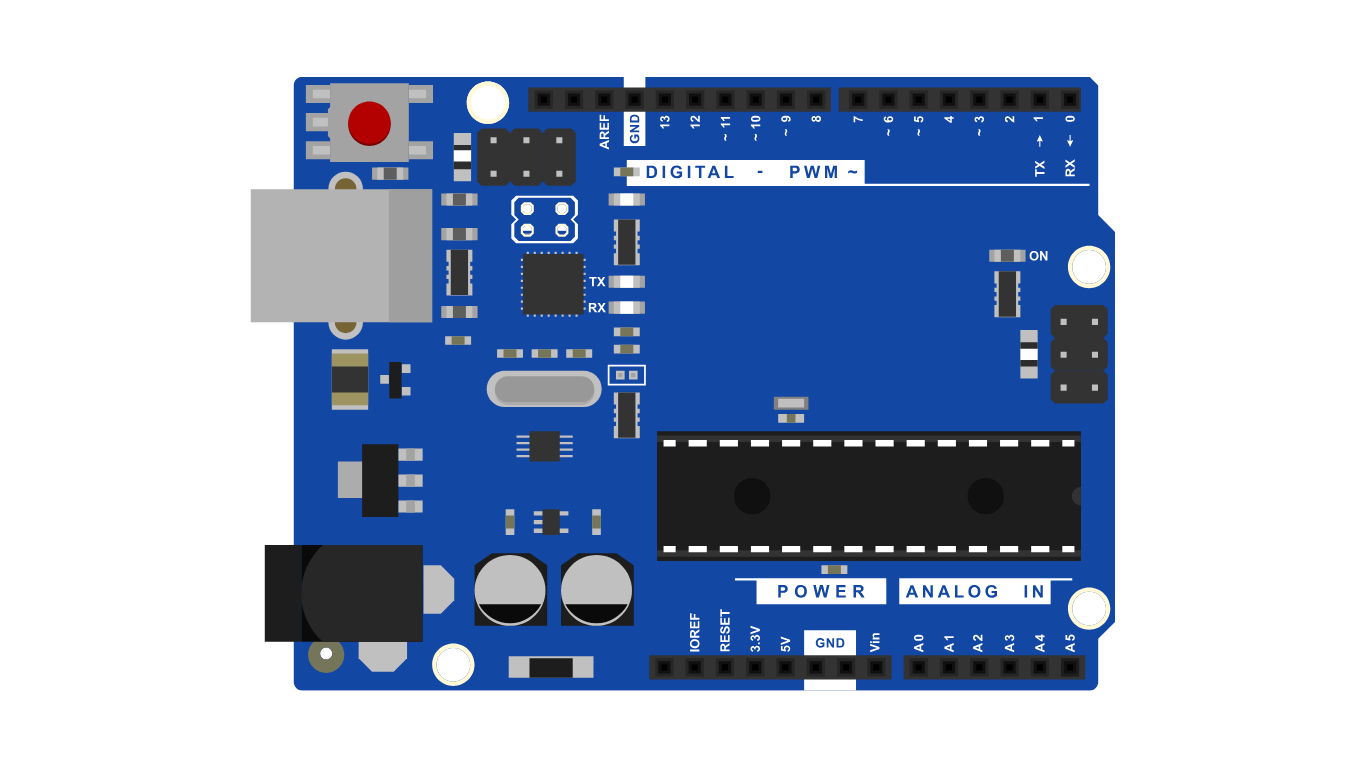
To avoid errors and burnt-out components, read what each part of the board in the image above means. Each label has its own role:
| Area on the Image | What does it mean? | What is it used for? |
|---|---|---|
| VBUS (5V) | USB Power | When you connect the board to a computer, you get a safe 5V voltage from here. |
| GND | Ground | The common point (negative pole) for all your components. It must be connected to the GND of your sensors. |
| Digital (0-13) | Digital Pins | They detect only two states: ON (5V/HIGH) or OFF (0V/LOW). Ideal for LEDs or buttons. |
| Analog (A0-A5) | Analog Inputs | They convert variable voltage (e.g., from a potentiometer) into a number between 0 and 1023. |
| PWM (~) | Pulse Width Modulation | Digital pins marked with `~` that can simulate analog voltage (for LED brightness) through rapid switching. |
| VIN / Power Jack | External Power | Connect e.g. a 9V battery or power supply here if you need Arduino "in the field". |
| RESET | Reset Button | Press it if you want the code on the Arduino to start from the beginning. |
On this website, I have divided the projects so that they guide you through different technologies:
| Technology | What will you learn? | Main Challenge |
|---|---|---|
| Displays (TFT 2.0) | Printing text, colors, and fast graphics refreshing. | Correct wiring of SPI pins. |
| Sensors (IR, RTC) | Reading real-time and detecting motion in a space. | Sensitivity adjustment (trimmer). |
| Communication (WiFi, RFID) | Connecting to the internet and contactless identification. | Secure storage of passwords and UID codes. |
| Power Circuits | Controlling 12V devices (LED strips) with 5V logic. | Using MOSFET transistors. |
What can you find in this tutorial?
My philosophy is simple: every project must have a clear schematic, verified code and a bill of materials. Here are the key pillars of my tutorial:
- Interactive tools: Calculators that read the colored rings on resistors for you.
- Bilingual code: All comments in the code are in Slovenian and English so you can understand every line.
- Real-world examples: From digital clocks that synchronize themselves with the internet to proximity detectors.
- C++ Simulator: A tool that allows you to write Arduino code in professional environments.